Sunday, May 27, 2007
Batu Caves!
Went out this morning to Batu Caves to take photos of the temple with SC and Brigitte. Surprisingly, the temple was quite crowded even though it wasn't a special Hindu festival -- turns out there was a wedding ceremony going on, which explains why everyone is out in their "Sunday best" so to speak. :) Nikon D200, AF-S Nikkor 12-24mm f/4
Waiting
This mother and son were probably waiting for their ride after the wedding was over. Nikon D200, AF-S Nikkor 18-200mm f/3.5-5.6
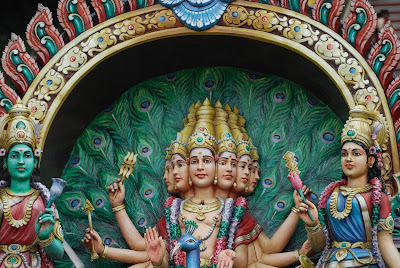
Many hands

The thing about Hindu temples is that they're so colourful, and always a joy to shoot in colour. Nikon D200, AF-S Nikkor 18-200mm f/3.5-5.6VR
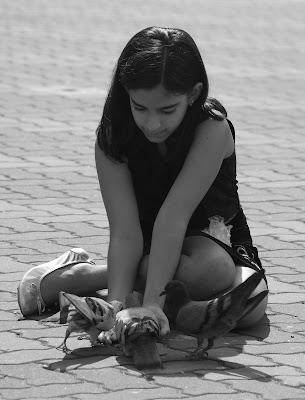
Feeding time

Probably the best shot I took on the trip to Batu Caves was this one of this pretty little girl feeding the pigeons. She was so intent on feeding the birds here that she was completely oblivious to me snapping away. The only problem I had was getting the pigeons properly in the frame and moving around so her father's legs were not. :) Converted to B+W and cropped slightly. The reason for the B+W conversion was to even out the tones and to get rid of the distracting colour of the tiles. Nikon D200, AF-S Nikkor 18-200mm f/3.5-5.6VR
Temple detail
Within Batu Caves, there are various statues built right into the walls of the cave. Nikon D200, AF-S Nikkor 12-24mm f/4DX
Garland for the gods
This monkey really looks like a reverent disciple offering a garland of flowers to the gods! In actual fact this naughty monkey had just stolen somebody's garland and was busy trying to eat it! Just shows you how misleading a photo can be. This shot has been slightly cropped to remove a bright yellow bannister in the foreground. Nikon D200, AF-S Nikkor 18-200mm f/3.5-5.6VR
Hole in the roof
Framing a shot like this is never easy - not only do you have problems with exposure, but the dark areas of the cave are liable to fool the camera's exposure meter into under- or over-exposing the shot. For this shot, I actually took two exposures -- one at the camera reading (which got the sky properly exposed but everything else a little under-exposed) and another shot with an EV+1 exposure to get just a little more of the cave walls (while not exposing TOO much). In the end, I merged the sky of the first shot with the cave walls of the second shot so I could get just a little bit of blue in the sky instead of having it completely white. Slightly cropped on the left for balance. Nikon D200, AF-S Nikkor 12-24mm f/4
Playing with fire
These children were a little camera-shy but after a couple of shots, they kinda warmed up to me and allowed me to shoot a few pictures. Nikon D200, AF-S VR Nikkor 18-200mm f/3.5-5.6
Caught in the light
With a shot like this, it's really important to have some interesting foreground detail to balance out the large expanse of plain foreground. Again, I set my camera up on a tripod and waited for somebody to step into just the right area and took a shot. I did several of these but this one seems to be the best. Nikon D200, AF-S Nikkor 12-24mm f/4DX
Cave entrance
I wanted to take a shot with some interesting movement in front of the statue in the centre so I set up the tripod and took a number of shots at a slow shutter speed (about 1.5secs if I am not wrong) and waited for people to pass by to create this blur effect. The important thing about taking intentionally blur shots is that you need to counteract it with something absolutely sharp in the shot, otherwise if everything were blur in the shot, it would just look like you had shaky hands! Too bad about the donation box in front -- I could remove it in Photoshop, but I thought I'd leave it there for authenticity's sake. Nikon D200 AF-S Nikkor 12-24mm f/4DX
Friday, May 25, 2007
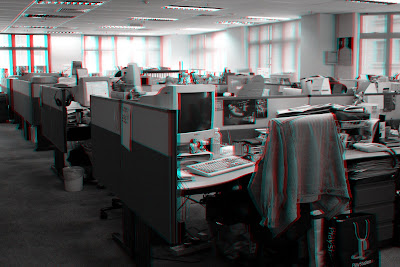
THREEE DEEE!
 What you see above is a 3D image taken with my camera a while back. This shot is actually a combination of two shots I took, one slight moved to one side of the other. Merged in Photoshop with some adjustments and you get this.
NB: To see it in 3D you need a pair of red/blue 3D glasses (some comics and 3D DVDs comes with one -- Spy Kids 3D comes to mind)-- make sure the red filter is over your left eye and blue filter over your right (some 3D glasses reverse this) and enjoy!
I did this a while back and I often forget how to do it again in Photoshop, so here is the text of an article I wrote a few years back so I can easily find it again on this blog when I need it:
- First, open both images in Photoshop, taking note which one is your left image and which one is the right.
- Start with image that you want to be on the left and then, in the Layers menu floating on the right of your screen, click on the Channels tab.
- In the Channels tab, you’ll see four different channels, RGB, Red, Green and Blue. Click on the Red channel to select it.
- Next, right-click and choose “Duplicate channel” — a pop-up menu will open when you do this.
- In the pop-up menu, under Destination/Document, click on the drop down menu and choose New. When you do this, a new drop down menu option will become available for you to name the new file. Name it anything you want, say “3DPix.”
- Now go to the second picture, the image which should be on the right and again click on the Channels tab.
- This time, however, select the Green channel, right-click on it and then select Duplicate Channel again. This time, in the Destination/ Document drop-down menu, choose the document you just created for the left image — in this case, the destination should be “3DPix.”
- Do this again, but this time right-click on the Blue channel, with the destination document again going to “3DPix.” Now click on the newly created 3DPix. It should still look like it’s in Black and White.
- To turn it back into colour, click on the Image menu at the top of the screen and go to Mode/RGB Colour and your picture should now be in colour with all the correct red and blue information.
- If you’ve done things correctly, then all you need is to save it and view it with the glasses.
- If however, your red and blue images are too far apart in the final image, you can use the Move tool and nudge the Red channel using the arrow keys so that the red and blue images are not spaced too far apart from each other.
- Also, when taking pictures, try not to have any large red or blue areas in the picture, otherwise they will look funny when you convert them.
- In fact, if you want the best effect, you might want to turn the picture into black and white images first.
- To do this, click on Image/Adjustments/Desaturate — this turns the images into black and white images (but with the colour information still intact) and then work on the images like before.
Friday, May 18, 2007
White hot
Day two of shooting habanero chillies -- I was fooling around with different-coloured backgrounds to contrast with the habaneros when I hit upon the idea of converting the colourful picture into a black-and-white one instead. The reason the habaneros here look much whiter than the background is because I applied the equivalent of a red filter in the conversion process. Traditional B+W photographers will be familiar with the use of blue, orange and red filters -- originally used to darken skies in relation to the rest of the scene (red generally filters out the blue in the sky, making it darker compared with the foreground) I used it here to lighten the red chillies and make the (originally) blue plate dark for a more striking image. Nikon D200, AF Micro-Nikkor 60mm f/2.8
Thursday, May 17, 2007
Chilli red

You don't have to go on photo excursions to shoot something interesting -- when I have nothing in particular to shoot, I whip out the old macro lens and challenge myself by looking for stuff around the house. You may think these are bright red capsicums, but actually these are habenero chillies which are only about the size of a marble. Habaneros are the third hottest chillies in the world, coming in at between 100,000 - 350,000 Scoville units and MUCH hotter than anything we have in Malaysia or Thailand. If you cut and then handle them with your bare hands, the heat from these chillies can burn for a few days! I shot quite a few of these chillies using wireless flash, carefully framing them each time so that I got a balance and enough depth-of-field (this was shot with an aperture of F/32!). I put the chillies in their natural setting -- at the bottom of my granite pestle and mortar! :) Nikon D200, AF Micro-Nikkor 60mm f/2.8
Wednesday, May 16, 2007
Looking up
When shooting photos of dogs, it's always important to focus on the eyes -- which isn't as easy as it sounds, since the camera's autofocus point is usually centrally-located and will most likely focus on the dog's nose in the centre of the frame. Modern cameras usually have multiple focus points which allow you to select an off-centre autofocus point, but even if you don't you can use the focus-lock feature. Focus lock is a feature on all cameras (whether digital or film compact cameras, SLR or DSLR) -- first, frame your shot so that the focussing point is over the dog's eye, then lightly press the shutter halfway to focus (all cameras have a so-called half-press for focussing and metering) and WITHOUT letting go of the half-press, recompose your shot and fully depress the shutter button to snap the picture. While my camera has 11 autofocus points, I generally only use the centre one and utilise focus lock then recompose and shoot. Yes, I'm very old school in this respect, since I come from the old days of manual focus and split prism focussing screens (here's a modern example). Nikon D200, AF Micro-Nikkor 60mm f/2.8
Ready to eat
Another shot of BB. She usually looks really cute with her ears back but it's quite difficult to get her to do it when you're pointing a camera at her. The only way is to just keep pointing the camera at her till she gets bored then shoot. Nikon D200, AF Micro-Nikkor 60mm f/2.8
Wednesday, May 09, 2007
Fluffy snout
Another shot of BB. I think the secret of taking pictures of pets is to really get down to their level to shoot. It makes the whole portrait more intimate and engaging, I think, than a top-down look. Nikon D200, AF Micro-Nikkor 60mm f/2.8
Greedy boy
This is DD, the son of BB, the result of an unplanned pregnancy one Chinese New Year. DD was born two years ago on April 1, which I suppose makes him an April's fool! haha. Strangely enough, DD was the only puppy to be born -- normally dogs tend to give birth to a litter of 3-5 puppies. Nikon D200, AF Micro-Nikkor 60mm f/2.8
The Curse of Fu Manchu
Some people who know me have commented that they don't see enough of my dogs on this photoblog, so here goes -- this week will entirely be devoted to photos of my two dogs, BB and DD (yes they have silly names). This is BB, who is some kind of terrier mix -- she appeared at my doorstep one day three years ago on a rainy day and has stayed here ever since. Shot using bounce flash with the SB-600 flashgun. Nikon D200, AF Micro-Nikkor 60mm f/2.8
Wednesday, May 02, 2007
Eyes to the sky
Well nothing to say about this shot really, except that I had to wait for a while before there wasn't anyone in the shot, which isn't easy when you consider that there were hundreds of people at this temple during Wesak Day celebrations. Nikon D200, AF-S VR Nikkor 18-200mm f/3.5-5.6G
Objects at rest
This cute white dog was happily sleeping, oblivious to the noise and bustle going on at the Thai Buddhist temple on Wesak Day. Nikon D200, AF-S VR Nikkor 18-200mm f/3.5-5.6G
Tiger umbrella
SC pointed this little girl and her father out to me and I only just had time to bring up the camera to my eye and take two shots before they walked away and into the crowd. I just thought this umbrella was incredibly cute. Nikon D200, AF-S VR Nikkor 18-200mm f/3.5-5.6G
Shoes
Though I go to the same Thai Buddhist temple every year to eat and take photos of the Wesak Day celebrations, I always try to set myself a challenge not to shoot the same shots. So I try to focus on other things I hadn't shot before the previous years. Revisiting the temple year after year is also a great exercise in trying to see things from a different perspective -- the temple and the setting is almost the same every year, but if you look carefully, you can shoot something different. Watch out for next year's shots! Nikon D200, AF-S VR Nikkor 18-200mm f/3.5-5.6G
Subscribe to:
Comments (Atom)


